跳到主要内容

· 阅读需 10 分钟
hyminghan

前言

在需要国际化的项目中经常会遇到写完代码后需要将文案翻译到其他很多国家语言,人工翻译再复制文案到对应 json 或 js / ts 文件,这样将会浪费大量时间且非常枯燥,所以很有必要开发一款 node 插件,将这些重复乏味的工作交给机器完成。话不多说,先展示成品再讲原理

插件链接

https://github.com/hymhub/language-translate

language-translate 是一款基于 Google 翻译在线转换 ts/js/json 多语言文件并批量生成或插入指定文件的插件,支持增量更新,可使用 bash 翻译单个文件,也能集成在项目中持续批量翻译,支持单文件转单文件,单文件转多文件,多文件转多文件,多文件转单文件

效果演示

正常翻译效果:

压力测试(1分钟内生成100种语言包):

原理

插件原理比较简单,核心是使用 node 读取文案文件,再利用 google 翻译 API 翻译文案后最终生成或写入结果,其中需要注意的是翻译前文案合并和翻译后文案拆分细节,此操作是翻译速度提升的关键

下面写一个简易版方便理解原理

安装依赖

首先安装以下 2 个依赖:

  1. @vitalets/google-translate-api:用于翻译文案
  2. tunnel:用于网络代理(大陆无法直接使用 Google API)

注意版本,es6 和 conmonjs 模块化下载的版本不同,方便演示,以 conmonjs 为例

npm i @vitalets/google-translate-api@8.0.0
npm i tunnel@0.0.6

编写翻译脚本

const fs = require('fs')
const tunnel = require('tunnel')
const google = require('@vitalets/google-translate-api')

const googleTranslator = (text) => google(
text,
{ from: 'en', to: 'zh-CN' },
{
agent: tunnel.httpsOverHttp({
proxy: {
host: '127.0.0.1',// 代理 ip
port: 7890, // 代理 port
headers: {
'User-Agent': 'Node'
}
}
})
}
)
// 读取 json 文案文件
const sourceJson = require('./en.json')
// 定义翻译方法
const translateRun = async (inputJson) => {
const sourceKeyValues = Object.entries(inputJson)
const resultJson = {}
for (let i = 0; i < sourceKeyValues.length; i++) {
const [key, value] = sourceKeyValues[i]
const { text } = await googleTranslator(value)
resultJson[key] = text
}
return resultJson
}
// 将翻译结果写入硬盘
translateRun(sourceJson).then(resultJson => {
fs.writeFileSync('./zh.json', JSON.stringify(resultJson))
})

将文案放入 en.json 例如:

{
"hello": "hello"
}

执行此脚本就会发现目录下生成了 zh.json 的翻译结果:

{"hello":"你好"}

但是现在还不能递归翻译 json 内容,并且每一个 key 都调用了一次接口

先完成递归功能,递归翻译的实现方案有多种,考虑到后期文案合并/拆分减少 API 调用频率,这里采用 json 扁平化的方法

编写扁平化和反扁平化方法

const flattenObject = (obj, prefix = '') => {
let result = {}
for (const key in obj) {
if (Object.prototype.hasOwnProperty.call(obj, key)) {
const nestedKey = prefix.length > 0 ? `${prefix}/${key}` : key
if (typeof obj[key] === 'object' && obj[key] !== null) {
const nestedObj = flattenObject(obj[key], nestedKey)
result = { ...result, ...nestedObj }
} else {
result[nestedKey] = obj[key]
}
}
}
return result
}

const unflattenObject = (obj) => {
const result = {}
for (const key in obj) {
if (Object.prototype.hasOwnProperty.call(obj, key)) {
const nestedKeys = key.split('/')
let nestedObj = result
for (let i = 0; i < nestedKeys.length; i++) {
const nestedKey = nestedKeys[i]
if (!Object.prototype.hasOwnProperty.call(nestedObj, nestedKey)) {
nestedObj[nestedKey] = {}
}
if (i === nestedKeys.length - 1) {
nestedObj[nestedKey] = obj[key]
}
nestedObj = nestedObj[nestedKey]
}
}
}
return result
}

扁平化方法的如何实现递归翻译?例如从传入:

const inputJson = {
"hello": "hello",
"colors": {
"red": "red"
}
}
flattenObject(inputJson) // { hello: 'hello', 'colors/red': 'red' }
// 此时进行翻译,例如结果是 { hello: '你好', 'colors/red': '红色的' }
// 再进行反扁平化
unflattenObject(resultJson) // {"hello":"你好","colors":{"red":"红色的"}}

搞懂扁平化原理后接着改造 translateRun 方法:

const translateRun = async (inputJson) => {
inputJson = flattenObject(inputJson)
const sourceKeyValues = Object.entries(inputJson)
const resultJson = {}
for (let i = 0; i < sourceKeyValues.length; i++) {
const [key, value] = sourceKeyValues[i]
const { text } = await googleTranslator(value)
resultJson[key] = text
}
return unflattenObject(resultJson)
}

现在已经能进行递归翻译了,接下来进行翻译前文案合并和翻译后文案拆分,目的是为了减少 API 调用频率,也是大大提高翻译速度的核心

翻译提速

继续改造 translateRun 方法:

const translateRun = async (inputJson) => {
inputJson = flattenObject(inputJson)
let chunkValuesLength = 0
let chunk = []
const chunks = []
const sourceKeyValues = Object.entries(inputJson)
sourceKeyValues.forEach(([key, value]) => {
// Google 翻译单次最大字符长度 5000 字, 5 为占位分隔符长度
if (chunkValuesLength + value.length + 5 >= 5000) {
chunks.push(chunk)
chunkValuesLength = 0
chunk = []
} else {
chunk.push({ key, value })
chunkValuesLength += (value.length + 5)
}
})
if (chunk.length > 0) {// 遍历完后检查不满 5000 字符的遗留
chunks.push(chunk)
chunkValuesLength = 0
chunk = []
}
const resultJson = {}
for (let i = 0; i < chunks.length; i++) {
const chunk = chunks[i]
const mergeText = chunk.map(v => v.value).join('\n###\n')// 合并文案
const { text } = await googleTranslator(mergeText)
const resultValues = text.split(/\n *# *# *# *\n/).map((v) => v.trim())// 拆分文案
if (chunk.length !== resultValues.length) {
throw new Error('翻译前文案碎片长度和翻译后的不一致')
}
chunk.forEach(({ key }, index) => {
resultJson[key] = resultValues[index]
})
}
return unflattenObject(resultJson)
}

现在放入大量文案在 en.json 文件,执行翻译脚本,假如文案有 1000 个 key 原本需要调用 1000 次接口,现在不到 10 次甚至不到 5 次即可翻译完成。

完整 demo:

const fs = require('fs')
const tunnel = require('tunnel')
const google = require('@vitalets/google-translate-api')

const flattenObject = (obj, prefix = '') => {
let result = {}
for (const key in obj) {
if (Object.prototype.hasOwnProperty.call(obj, key)) {
const nestedKey = prefix.length > 0 ? `${prefix}/${key}` : key
if (typeof obj[key] === 'object' && obj[key] !== null) {
const nestedObj = flattenObject(obj[key], nestedKey)
result = { ...result, ...nestedObj }
} else {
result[nestedKey] = obj[key]
}
}
}
return result
}

const unflattenObject = (obj) => {
const result = {}
for (const key in obj) {
if (Object.prototype.hasOwnProperty.call(obj, key)) {
const nestedKeys = key.split('/')
let nestedObj = result
for (let i = 0; i < nestedKeys.length; i++) {
const nestedKey = nestedKeys[i]
if (!Object.prototype.hasOwnProperty.call(nestedObj, nestedKey)) {
nestedObj[nestedKey] = {}
}
if (i === nestedKeys.length - 1) {
nestedObj[nestedKey] = obj[key]
}
nestedObj = nestedObj[nestedKey]
}
}
}
return result
}

const googleTranslator = (text) => google(
text,
{ from: 'en', to: 'zh-CN' },
{
agent: tunnel.httpsOverHttp({
proxy: {
host: '127.0.0.1',// 代理 ip
port: 7890, // 代理 port
headers: {
'User-Agent': 'Node'
}
}
})
}
)
// 读取 json 文案文件
const sourceJson = require('./en.json')
// 定义翻译方法
const translateRun = async (inputJson) => {
inputJson = flattenObject(inputJson)
let chunkValuesLength = 0
let chunk = []
const chunks = []
const sourceKeyValues = Object.entries(inputJson)
sourceKeyValues.forEach(([key, value]) => {
// Google 翻译单次最大字符长度 5000 字, 5 为占位分隔符长度
if (chunkValuesLength + value.length + 5 >= 5000) {
chunks.push(chunk)
chunkValuesLength = 0
chunk = []
} else {
chunk.push({ key, value })
chunkValuesLength += (value.length + 5)
}
})
if (chunk.length > 0) {// 遍历完后检查不满 5000 字符的遗留
chunks.push(chunk)
chunkValuesLength = 0
chunk = []
}
const resultJson = {}
for (let i = 0; i < chunks.length; i++) {
const chunk = chunks[i]
const mergeText = chunk.map(v => v.value).join('\n###\n')// 合并文案
const { text } = await googleTranslator(mergeText)
const resultValues = text.split(/\n *# *# *# *\n/).map((v) => v.trim())// 拆分文案
if (chunk.length !== resultValues.length) {
throw new Error('翻译前文案碎片长度和翻译后的不一致')
}
chunk.forEach(({ key }, index) => {
resultJson[key] = resultValues[index]
})
}
return unflattenObject(resultJson)
}
// 将翻译结果写入硬盘
translateRun(sourceJson).then(resultJson => {
fs.writeFileSync('./zh.json', JSON.stringify(resultJson))
})

结语

有了核心思路,其他的就是细节完善以及不断排坑了,例如合并拆分文案的特殊字符在不同语言会有异常,所以需要测试出不同语言所支持的特殊字符拆分方法,在翻译时根据不同语言使用不同的特殊字符进行分割,以及断点再续(文案太长,翻译中断导致浪费已翻译的文案)、增量更新等等,希望这篇文章对你有所帮助哦~

· 阅读需 14 分钟
hyminghan

前言

在 React 开发中如果不去管组件的重复渲染问题,项目稍微复杂一点性能将不堪入目,下面将介绍项目中最常见的例子及解决方案(仅 hooks 组件)。

预先了解所用知识

  1. React.memo
  2. React.useCallback
  3. React.useMemo
  4. useMemoizedFn(利用 ref + useMemo 配合单例模式实现比 useCallback 更加好用的 hook,下面会提,推荐尝试)

没错,只需使用上面 4 点即可解决大多数组件重复渲染问题,而如何合理去使用呢?

例 1: 父组件状态更新导致子组件无效渲染

const Parent = () => {
const [count, setCount] = useState(0);
const [son1Count, setSon1Count] = useState(0);
const [son2Count, setSon2Count] = useState(0);
return (
<div>
{console.log("Parent render")}
<button onClick={() => setCount((v) => v + 1)}>Parent + 1</button>
<button onClick={() => setSon1Count((v) => v + 1)}>Son1 + 1</button>
<button onClick={() => setSon2Count((v) => v + 1)}>Son2 + 1</button>
<h3>Parent: {count}</h3>
<Son1 son1Count={son1Count} />
<Son2 son2Count={son2Count} />
</div>
);
};
const Son1 = (props) => {
return (
<div>
{console.log("Son1 render")}
Son1: {props.son1Count}
</div>
);
};
const Son2 = (props) => {
return (
<div>
{console.log("Son2 render")}
Son2: {props.son2Count}
</div>
);
};

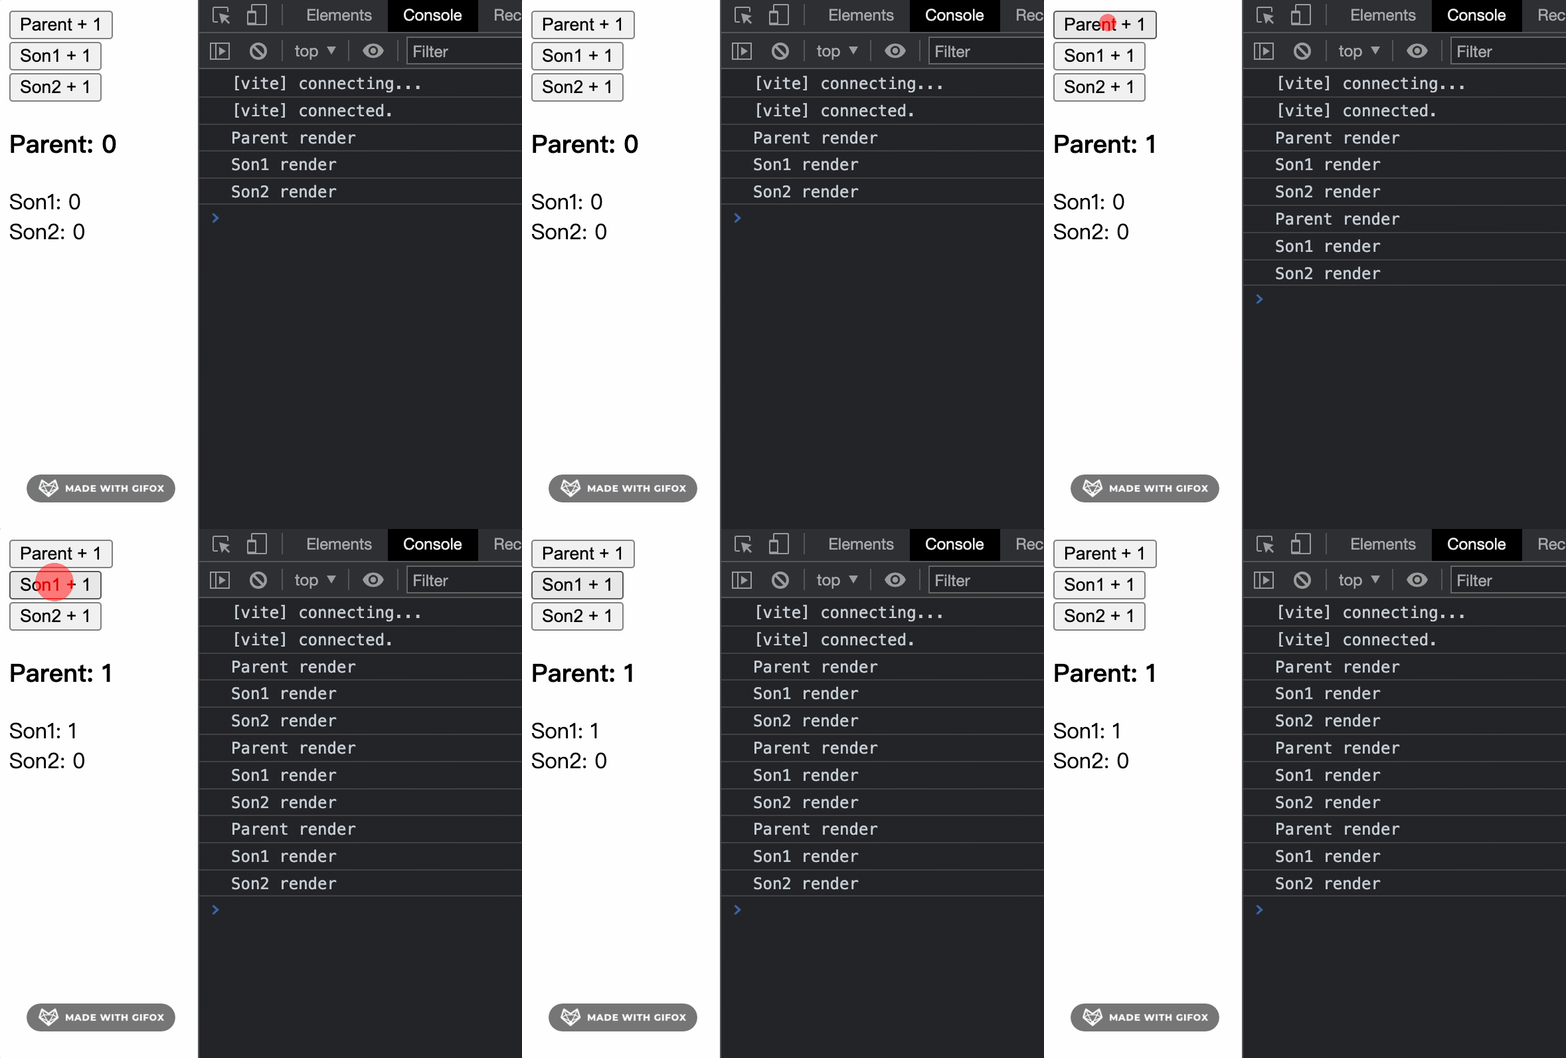
可以看出,无论改变哪个值,所有组件都重新渲染了,理想情况是改变 count 值实际并不需要 Son1 和 Son2 组件重新渲染,改变 son1Count 也不需要 Son2 重新渲染,简而言之就是子组件所依赖的值没发生变化就不需要重新渲染,上面情况只需将子组件用 React.memo 包裹即可:

const Son1 = React.memo((props) => {
return (
<div>
{console.log("Son1 render")}
Son1: {props.son1Count}
</div>
);
});
const Son2 = React.memo((props) => {
return (
<div>
{console.log("Son2 render")}
Son2: {props.son2Count}
</div>
);
});

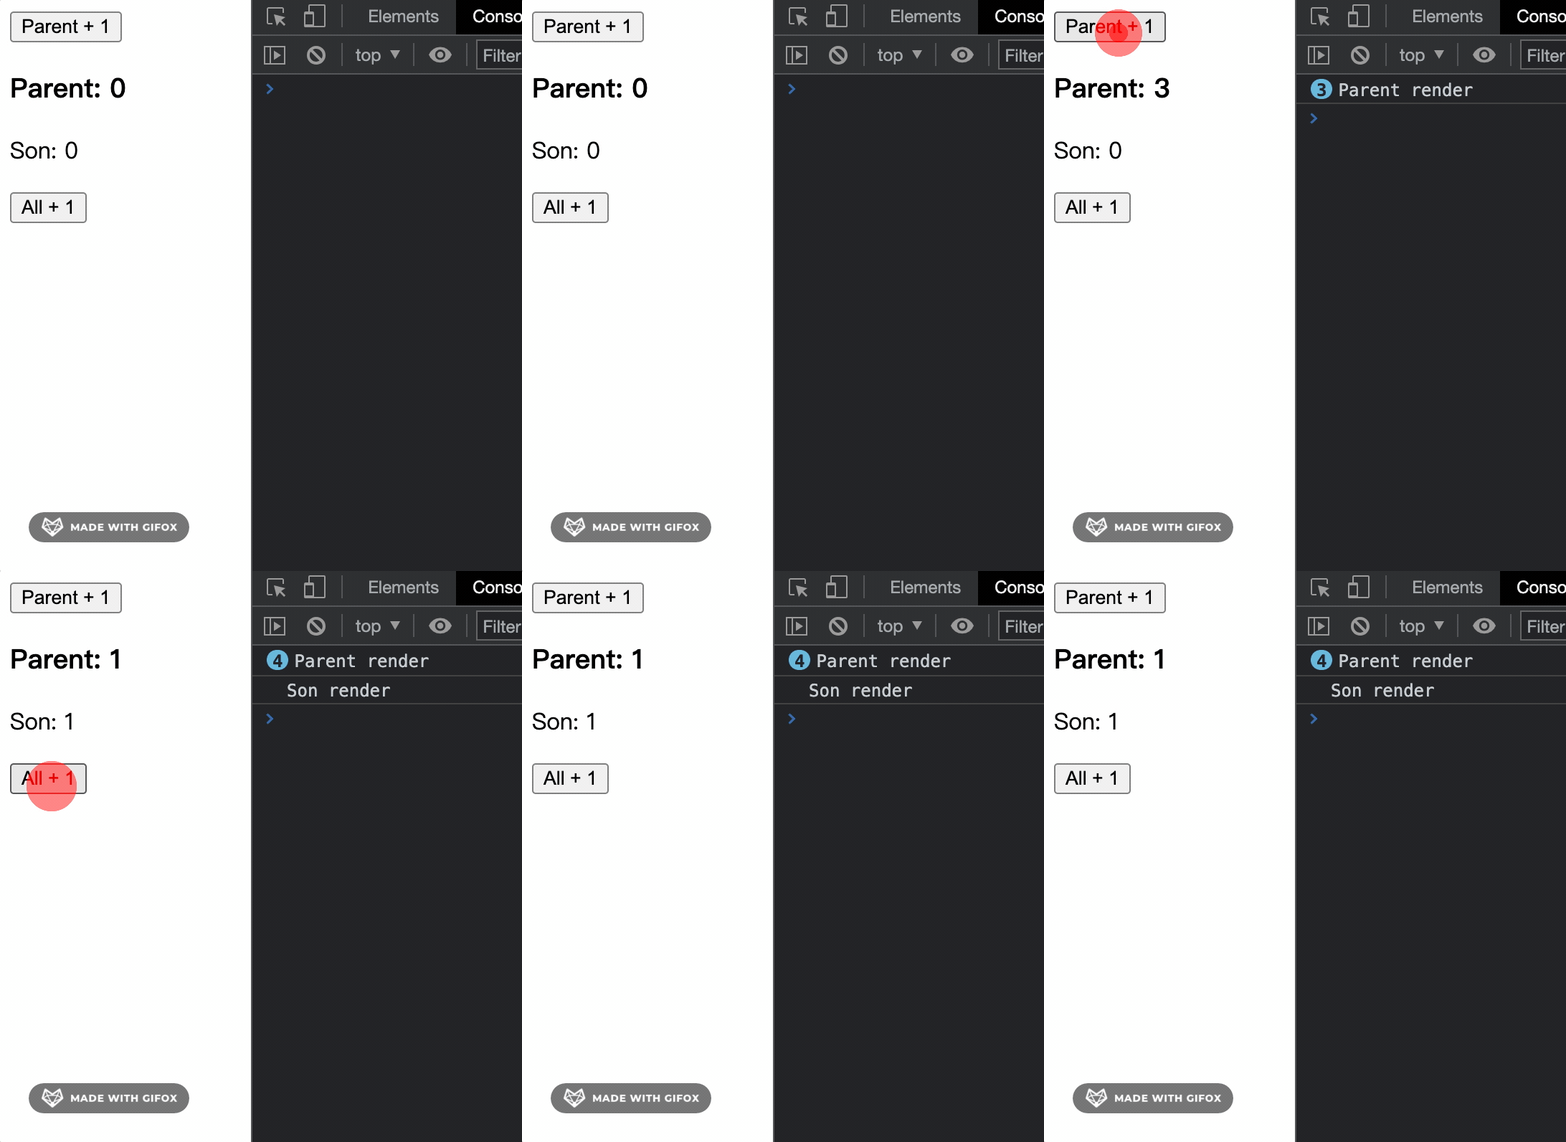
可以看到轻松包裹一下就已经达到理想效果,React.memo 本质就是一个高阶组件(HOC),通过浅比较(比较栈内存中的值) props、state 和 render 的内容来判断是否需要重新渲染组件。而有时候子组件不得不依赖父组件的值,但这个依赖的值发生改变又不需要重新渲染组件怎么办,接着看下面例 2。
例 2: 自定义子组件是否重新渲染

const Parent = () => {
const [random, setRandom] = useState(Math.random());
const [nowTime, setNowTime] = useState(new Date().toLocaleString());
const timerRef = useRef();
useEffect(() => {
timerRef.current = setInterval(() => {
setRandom(Math.random());
}, 1000);
return () => {
clearInterval(timerRef.current);
};
});
return (
<div>
{console.log("Parent render")}
<h3>random: {random}</h3>
<button onClick={() => setNowTime(new Date().toLocaleString())}>
点击更新子组件
</button>
<Son random={random} nowTime={nowTime} />
</div>
);
};
const Son = React.memo((props) => {
return (
<div>
{console.log("Son render")}
<p>
{props.nowTime}父组件 random 值为: {props.random}
</p>
</div>
);
});

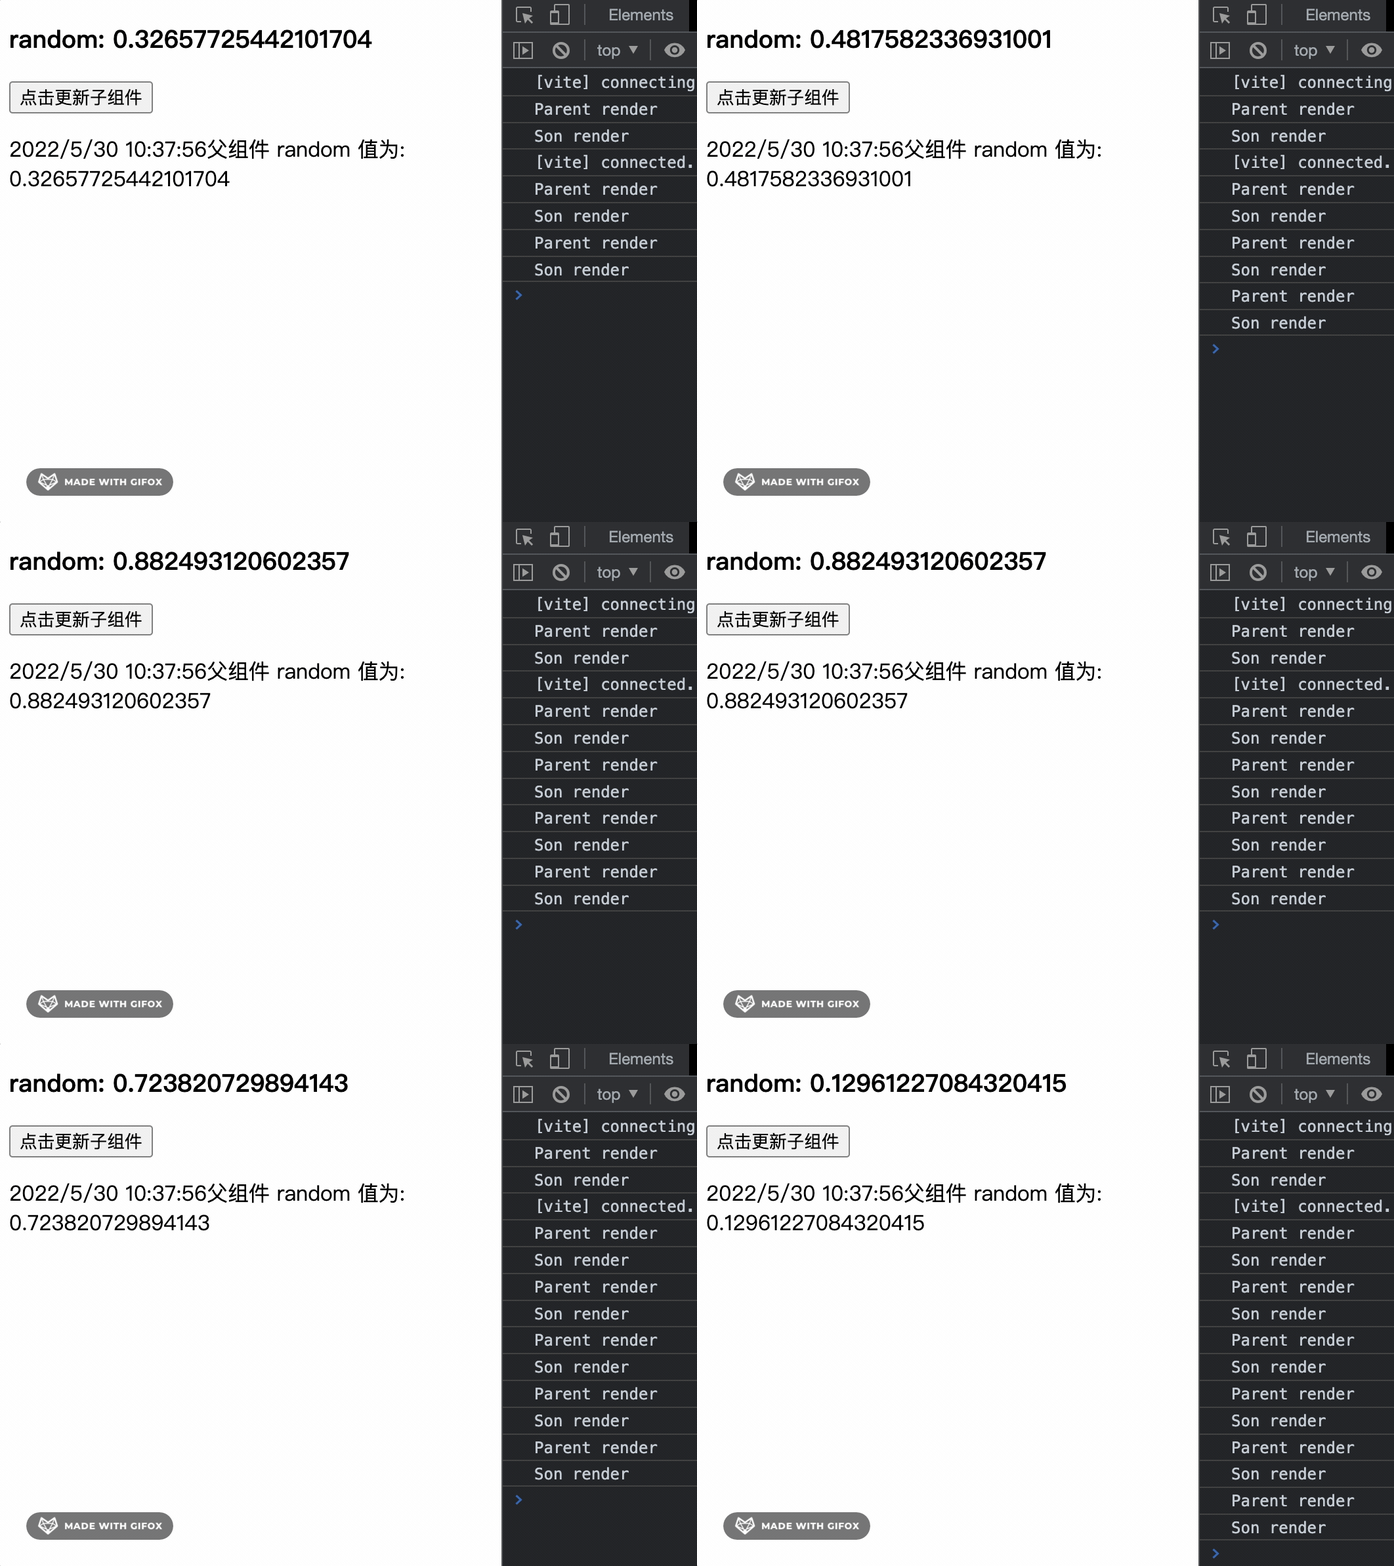
上面例子中,子组件依赖父组件 random 和 nowTime,而子组件理想是在点击按钮 nowTime 发生改变后 才重新渲染组件显示 random 的值,不需要上面那样实时渲染,此时只需要在 React.memo 第二个参数自定义渲染规则即可,React.memo 第二个参数为可选参数:

function memo<P extends object>(
Component: FunctionComponent<P>,
propsAreEqual?: (
prevProps: Readonly<PropsWithChildren<P>>,
nextProps: Readonly<PropsWithChildren<P>>
) => boolean
): NamedExoticComponent<P>;

看函数签名可知,第二个参数可传一个回调函数,回调函数会有两个形参,props 状态改变前的值和改变后的值,返回值为一个布尔值,true 禁止重新渲染,false 将重新渲染,和以往 class 组件中的 shouldComponentUpdate 生命周期钩子用法很像,下面加入自定义渲染判断条件,即只在 props.nowTime 发生改变时进行重新渲染:

const Son = React.memo(
(props) => {
return (
<div>
{console.log("Son render")}
<p>
{props.nowTime}父组件 random 值为: {props.random}
</p>
</div>
);
},
(prevProps, nextProps) => prevProps.nowTime === nextProps.nowTime
);

从上图可见只有 props.nowTime 发生改变才会重新渲染。第二个参数的判断规则在实际开发中还有很多妙用,比如一些情况可以替代 useCallback,后面会提一下。
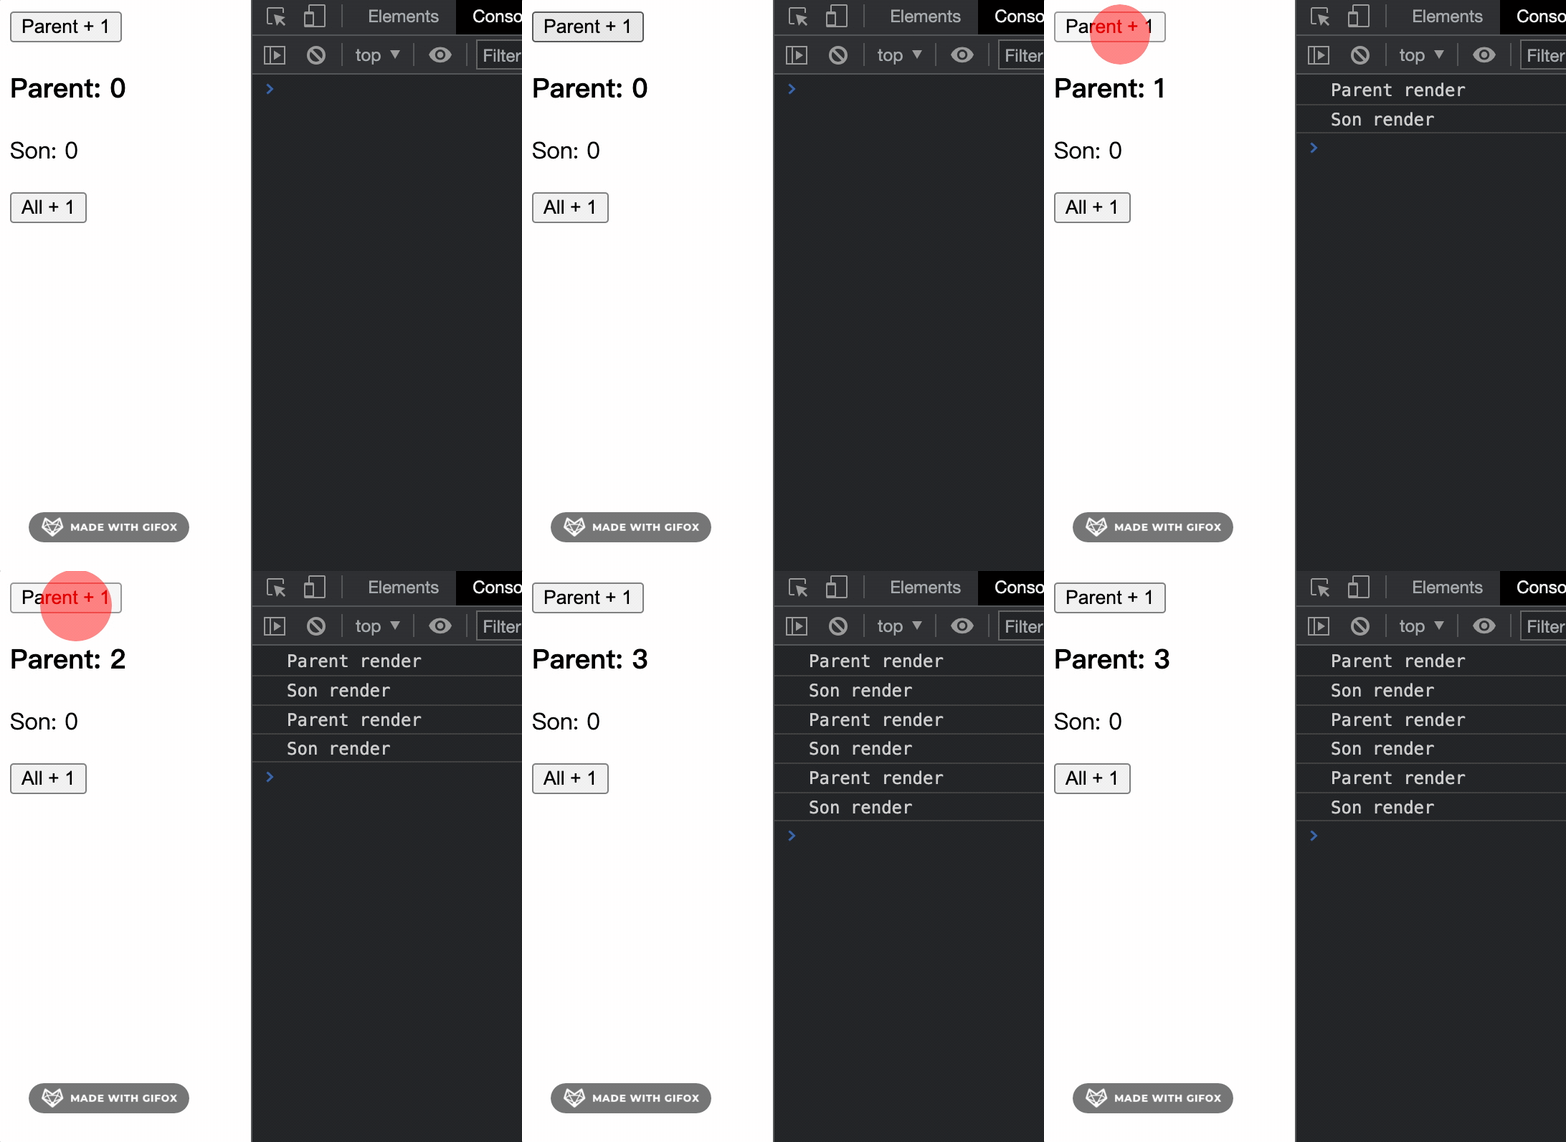
例 3: 向子组件传递方法(状态提升)导致子组件无效渲染

const Parent = () => {
const [count, setCount] = useState(0);
const [sonCount, setSonCount] = useState(0);
const allPlus = () => {
setCount((v) => v + 1);
setSonCount((v) => v + 1);
};
return (
<div>
{console.log("Parent render")}
<button onClick={() => setCount((v) => v + 1)}>Parent + 1</button>
<h3>Parent: {count}</h3>
<Son allPlus={allPlus} sonCount={sonCount} />
</div>
);
};
const Son = React.memo((props) => {
return (
<div>
{console.log("Son render")}
<p>Son: {props.sonCount}</p>
<button onClick={props.allPlus}>All + 1</button>
</div>
);
});

从控制台输出可以看见,当传递一个方法给子组件时,就算使用 React.memo 进行包裹也不济于事,导致该问题出现的根本原因是当 count 发生改变导致父组件发生重新渲染,Parent 组件本质也是一个函数,所以 const allPlus = () => { setCount(count + 1); setSonCount(sonCount + 1); }; 也会重新执行一次,这就意味着 allPlus 已经重新赋值,此时虽然看起来没什么变化,实际上 allPlus 在栈内存中的地址已经改变,而 React.memo 默认正是通过浅比较决定是否重新渲染,也就导致只要父组件发生重绘,子组件一定会跟着无效重绘。 使用 React.useCallback 缓存函数解决子组件无效渲染,只需将上面 allPlus 方法使用 useCallback 包裹:
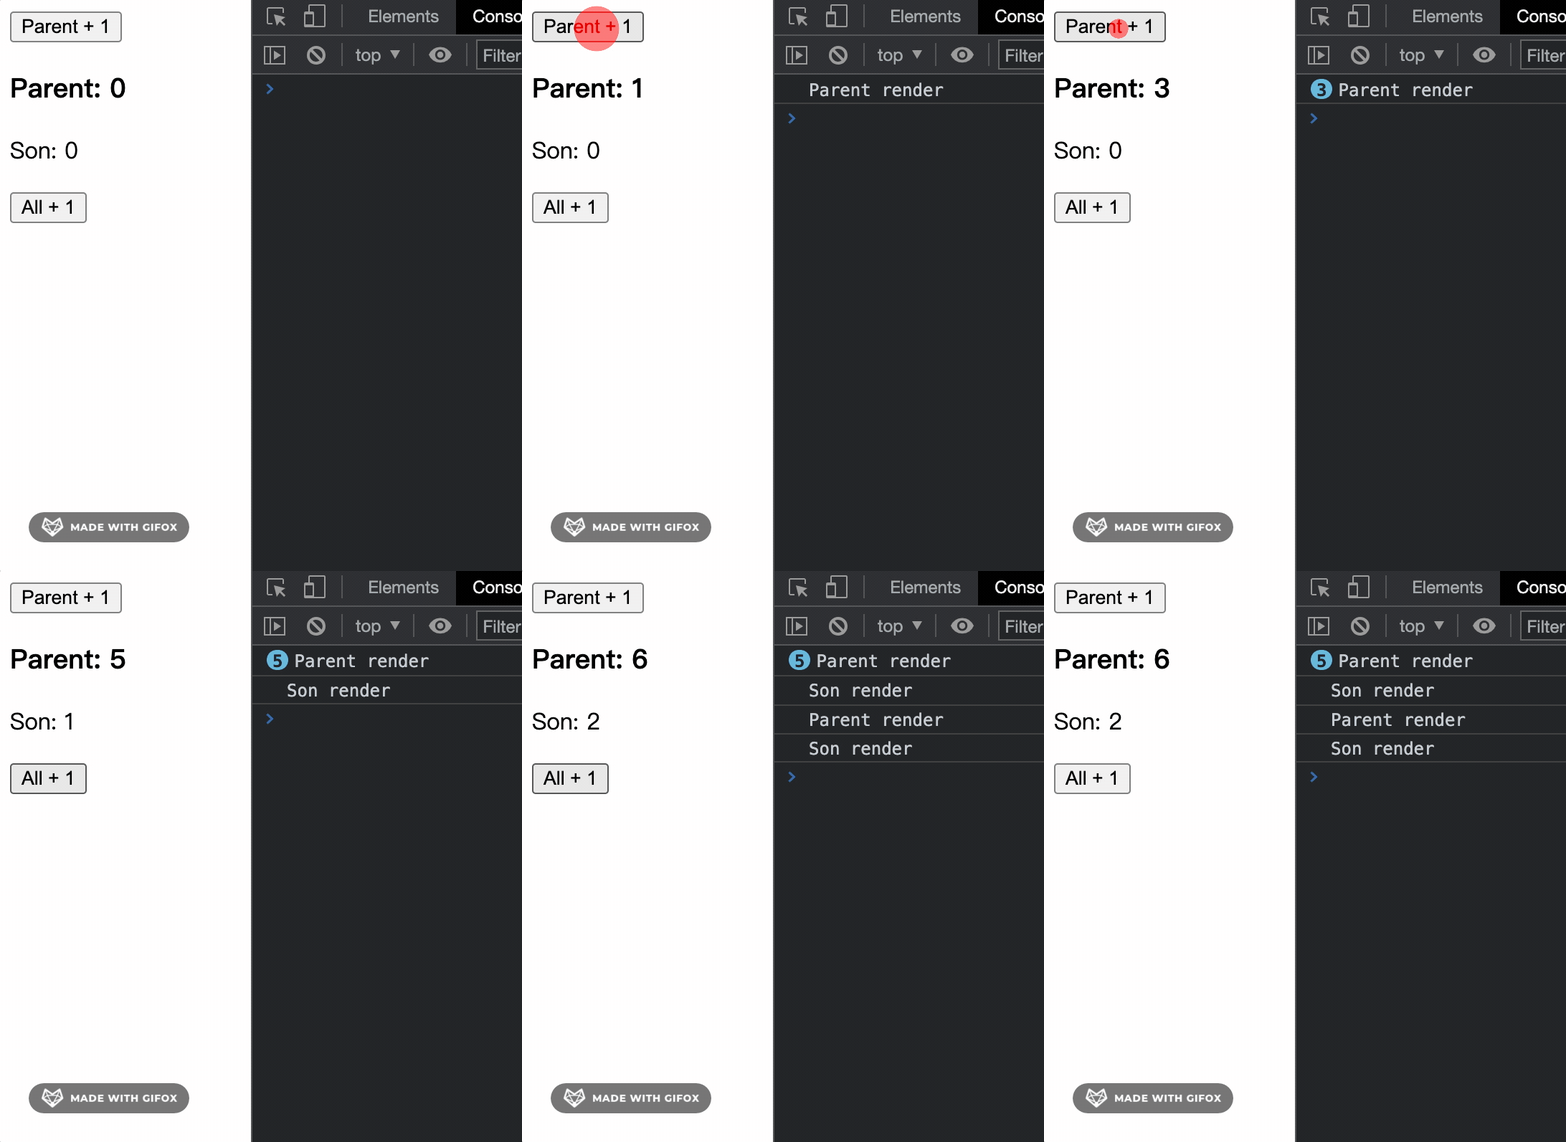
const allPlus = useCallback(() => {
setCount((v) => v + 1);
setSonCount((v) => v + 1);
}, []);

function useCallback<T extends (...args: any[]) => any>(
callback: T,
deps: DependencyList
): T;

从 useCallback 函数签名看到,需要传递两个参数,第一个传需要缓存的函数,第二个是依赖值,其本质就是返回的是一个 memoized(缓存)函数,在依赖不变的情况下,多次定义的时候,返回的值是相同的,他的实现原理是当使用一组参数初次调用函数时,会缓存参数和计算结果,当再次使用相同的参数调用该函数时,会直接返回相应的缓存结果,上面例子依赖值为空数组,所以无论怎样 allPlus 栈内存值都不会变,也就不会触发子组件无效重绘。 在向子组件传递方法时在项目中很多时候会懒得专门声明一个函数绑定到子组件,例如:

<Son
onClick={() => {
setCount((v) => v + 1);
setSonCount((v) => v + 1);
}}
sonCount={sonCount}
/>

如果不会有性能影响自然无所谓,但若是触发无效重绘就需要考虑了。 注意: 依赖值一定要谨慎处理,根据实际情况设定,例如上面例子 allPlus 中 setState 都是采用回调函数传参,假如改成直接传参,而又不给定依赖值,就会造成缓存的函数中无法获取最新值,例如上述例子 allPlus 改为:

const allPlus = useCallback(() => {
setCount(count + 1);
setSonCount(sonCount + 1);
}, []);

很明显看到 All + 1 后 setCount 中 count 并不是最新值,而是上一次缓存函数时的值,所以缓存函数在添加依赖时需要视情况而定,否则出现 bug 排查起来时可能会令人头痛不已,

推荐尝试 useMemoizedFn

上面 useCallback 解决的问题可以被 ahooks 中的 useMemoizedFn(点击useMemoizedFn去看官方例子)完全替代,只需要将上面的 allPlus 方法使用 useMemoizedFn 进行包裹即可,并且不需要传依赖,这个 hook 设计很好,React 官方提案弄个 useEvent 我想就类似 useMemoizedFn 这种了吧,看看它的源码:

function useMemoizedFn(fn) {
if (process.env.NODE_ENV === "development") {
// 测试环境参数类型判断
if (!utils_1.isFunction(fn)) {
console.error(
"useMemoizedFn expected parameter is a function, got " + typeof fn
);
}
}

var fnRef = react_1.useRef(fn); // why not write `fnRef.current = fn`?
// https://github.com/alibaba/hooks/issues/728
// 这里相当巧妙的利用 Ref 配合 useMemo 去缓存方法使内部能拿到最新值还不用传手动传依赖
fnRef.current = react_1.useMemo(
function () {
return fn;
},
[fn]
);
var memoizedFn = react_1.useRef();
// 这里使用单例模式让返回出去的方法实例化后引用地址永远不变,在调用的时候再去用上面的 fnRef,
// 不仅解决了重复渲染,连内部引用状态更新都不用重复渲染,这设计的确厉害。
if (!memoizedFn.current) {
memoizedFn.current = function () {
var args = [];

for (var _i = 0; _i < arguments.length; _i++) {
args[_i] = arguments[_i];
}

return fnRef.current.apply(this, args);
};
}

return memoizedFn.current;
}

例 4: 妙用 React.memo 或 React.useMemo 防止子组件无效渲染

将例 3 中 allPlus 方法不使用 useCallback 缓存,通过子组件 React.memo 第二个参数自定义渲染规则达到目的:

const Parent = () => {
const [count, setCount] = useState(0);
const [sonCount, setSonCount] = useState(0);
const allPlus = () => {
setCount((v) => v + 1);
setSonCount((v) => v + 1);
};
return (
<div>
{console.log("Parent render")}
<button onClick={() => setCount((v) => v + 1)}>Parent + 1</button>
<h3>Parent: {count}</h3>
<Son allPlus={allPlus} sonCount={sonCount} />
</div>
);
};
const Son = React.memo(
(props) => {
return (
<div>
{console.log("Son render")}
<p>Son: {props.sonCount}</p>
<button onClick={props.allPlus}>All + 1</button>
</div>
);
},
(prevProps, nextProps) => prevProps.sonCount === nextProps.sonCount
);

使用 useMemo 缓存 allPlus 方法,useMemo 和 useCallback 一样第一个参数传回调函数,第二个传依赖值,它们不同的地方在于 useMemo 缓存的是第一个参数回调函数的返回值,而 useCallback 直接缓存第一个参数,也就是回调函数:

const Parent = () => {
const [count, setCount] = useState(0);
const [sonCount, setSonCount] = useState(0);
const allPlus = useMemo(
() => () => {
// 注意这里不同于 useCallback
setCount((v) => v + 1);
setSonCount((v) => v + 1);
},
[]
);
return (
<div>
{console.log("Parent render")}
<button onClick={() => setCount((v) => v + 1)}>Parent + 1</button>
<h3>Parent: {count}</h3>
<Son allPlus={memoizedAllPlus} sonCount={sonCount} />
</div>
);
};
const Son = React.memo((props) => {
return (
<div>
{console.log("Son render")}
<p>Son: {props.sonCount}</p>
<button onClick={props.allPlus}>All + 1</button>
</div>
);
});

这样也能达到效果,但不建议这样操作,因为 useMemo 在设计上实际用处在于缓存数据,例如对一个很大的数据做二次处理,避免每次渲染做无意义的计算导致性能降低,而 useCallback 才是为缓存函数而生。

总结

虽然看上去只用了 React.memo、React.useCallback、React.useMemo 这三个,甚至 React.useMemo 都算不上就能处理组件的重复渲染问题,但在实际操作过程中考虑的因素也不少,当然有时候甚至也可以不用去管重复渲染问题,例如一个页面中组件拆分的少,业务并不复杂,此时看见函数就去缓存,看见组件就用 React.memo 包裹,这样性能没什么变化反而是画蛇添足。另外若项目复杂但盲目大量的去使用 React.memo、React.useCallback、React.useMemo,依赖值或判断规则不去综合实际情况处理,在 debug 时很可能会让人痛不欲生且还会有内存泄露风险,所以状态提升方面还是比较建议合理尝试下 ahooks 中的useMemoizedFn,源码也就那么几句,确有如此大作用!

· 阅读需 16 分钟
hyminghan

Phaser官方简介

Phaser是一个HTML5游戏框架,它的目的是辅助开发者真正快速地制作强大的、跨浏览器的HTML5游戏。 做这个框架,主要是想发掘现代浏览器(兼及桌面和移动两类系统)的优点。对浏览器的唯一要求是,支持画布(canvas)标签。

游戏链接

在线体验:http://hymhub.gitee.io/plane-game-phaser/(ps: 没做资源加载动画,点击开始游戏出现黑屏请耐心等待)

源码地址:https://gitee.com/hymhub/plane-game-phaser

游戏说明

  • 操作 PC端:键盘上下左右控制我方飞机移动,也可以鼠标左键按住飞机拖动 移动端:按住飞机拖动
  • 道具 连发道具:吃到后增加一发子弹,上限9发,单发有效期12秒 炸弹道具:吃到后消灭全屏内敌方飞机

代码

搭建开发环境

使用 Phase 必须使用服务器方式启动,出于安全性考虑,Phaser 不能通过 file:// 方式加载本地资源,如果是 vscode 可以装一个 Live Server 插件 随后鼠标右键 html 文件点击 Open with Live Server 即可
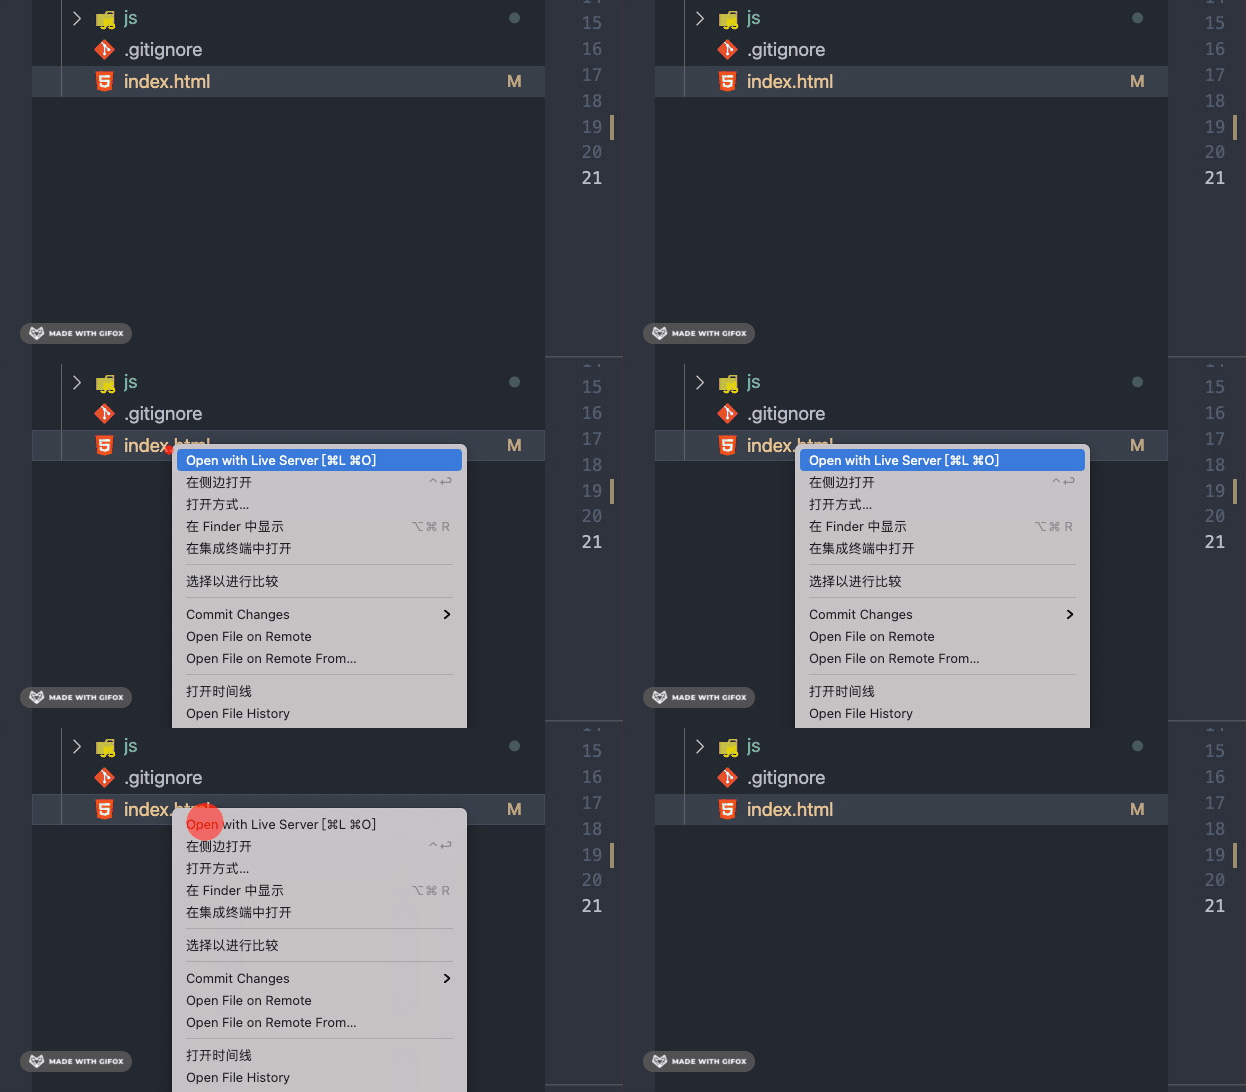
也可直接使用 vue/react 脚手架或是其他工具(例如 nginx、tomcat、WAMP Server、XAMPP)

创建初始化游戏场景

html:

<!DOCTYPE html>
<html lang="en">
<head>
<meta charset="UTF-8">
<meta http-equiv="X-UA-Compatible" content="IE=edge">
<meta name="viewport" content="width=device-width, initial-scale=1.0">
<title>plane-game-phaser</title>
<style>
body {
margin: 0;
width: 100vw;
height: 100vh;
text-align: center;
}
</style>
<script type="text/javascript" src="./js/phaser.js"></script>
<!-- phaser3 框架代码可以从上面的项目源码中获取,也可以使用网络地址: -->
<!-- <script src="https://cdn.jsdelivr.net/npm/phaser@3.15.1/dist/phaser-arcade-physics.min.js"></script> -->
</head>
<body>
<script type="text/javascript" src="./js/index.js"></script>
</body>
</html>

js:

// 获取屏幕宽度
let viewWidth = document.body.clientWidth > 420 ? 420 : document.body.clientWidth
// 获取屏幕高度
let viewHeight = document.body.clientHeight > 812 ? 812 : document.body.clientHeight
// 获取 dpr 设置分辨率
const DPR = window.devicePixelRatio

// 创建场景,场景1(初始化游戏)
class InitScene extends Phaser.Scene {
constructor() {
super({ key: 'InitScene' })
}
// 开始按钮
startBtn = null
preload() {
// 加载资源,游戏图片资源可以从上面的项目源码中获取
this.load.image('initBG', 'assets/imgs/startBG.png')
this.load.image('startBtn', 'assets/imgs/start_btn.png')
}
create() {
// 设置缩放让背景拉伸铺满全屏 ,也可使用 setDisplaySize(viewWidth, viewHeight)
this.add.image(viewWidth / 2, viewHeight / 2, 'initBG').setScale(viewWidth / 320, viewHeight / 568)
this.startBtn = this.add.sprite(viewWidth / 2, viewHeight / 2 + 140, 'startBtn').setInteractive().setScale(.5)
// 绑定开始按钮事件
this.startBtn.on('pointerup', function () {
game.scene.start('GameScene') // 启动游戏中场景,后面会创建
game.scene.sleep('InitScene') // 使当前场景睡眠
})
}
update() {}
}
const config = {
type: Phaser.AUTO, // Phaser 检测浏览器支持情况自行选择使用 webGL 还是 Canvas 进行绘制
width: viewWidth,
height: viewHeight,
antialias: true, // 抗锯齿
zoom: 0.99999999, // 缩放
resolution: DPR || 1, // 分辨率
physics: { // 物理系统
default: 'arcade',
arcade: {
gravity: { y: 0 }, // y 重力
debug: false
}
},
scene: [InitScene], // 场景
}
const game = new Phaser.Game(config)

创建游戏中场景并绑定键盘控制飞机移动

// 创建场景, 场景2(游戏中)
class GameScene extends Phaser.Scene {
constructor() {
super({ key: 'GameScene' })
}
// 只要是给当前类设置的属性并且值为 null,则会在下面 create 中进行初始化
// phaser 内置键盘管理器
cursors = null
// 游戏背景
bg = null
initData() {
this.isGameOver = false // 判断游戏是否结束
// 我方飞机x,y(非实时,用于拖拽和初始化使用,获取实时直接player.x/player.y)
this.x = viewWidth / 2
this.y = viewHeight - 200
// 游戏运行全局速度控制
this.speed = 0.4
}
preload() {
this.load.image('gameBG', 'assets/imgs/gameBG.png')
this.load.spritesheet('myPlane', 'assets/imgs/myPlane.png', { frameWidth: 66, frameHeight: 82 })
}
create() {
this.initData()
// 初始化 phaser 内置键盘管理器
this.cursors = this.input.keyboard.createCursorKeys()
// 使用 tileSprite 添加背景,在 update 函数中 y 值自减使背景无限滚动
this.bg = this.add.tileSprite(viewWidth / 2, viewHeight / 2, viewWidth, viewHeight, 'gameBG')
// 创建我飞机精灵并开启交互
this.player = this.physics.add.sprite(this.x, this.y, 'myPlane').setInteractive()
// 设置世界边界防止我方飞机飞出屏幕
this.player.setCollideWorldBounds(true)
// 重力设置与 config 中一致,飞机大战游戏我方飞机不需要重力
this.player.body.setGravityY(0)
// 创建我方飞机正常游戏动画
this.anims.create({
key: 'myPlaneRun',
frames: this.anims.generateFrameNumbers('myPlane', { start: 0, end: 1 }),
frameRate: 8,
repeat: -1
})
// 创建我方飞机爆炸动画
this.anims.create({
key: 'myPlaneBoom',
frames: this.anims.generateFrameNumbers('myPlane', { start: 2, end: 5 }),
frameRate: 8,
})
}
update() {
if (this.isGameOver) {
// game over 播放我方飞机爆炸动画
this.player.anims.play('myPlaneBoom', true)
} else {
// 背景无限滚动
this.bg.tilePositionY -= this.speed
// 播放我放飞机正常动画
this.player.anims.play('myPlaneRun', true)
// 键盘控制我方飞机移动
if (this.cursors.left.isDown) {
this.player.setVelocityX(-260)
} else if (this.cursors.right.isDown) {
this.player.setVelocityX(260)
} else {
this.player.setVelocityX(0)
}
if (this.cursors.up.isDown) {
this.player.setVelocityY(-260)
} else if (this.cursors.down.isDown) {
this.player.setVelocityY(260)
} else {
this.player.setVelocityY(0)
}
}
}
}

config 中 scene 添加场景: scene: [InitScene, GameScene], 现在点击开始游戏后即可看到飞机跑起来了,并且可以键盘上下左右控制移动

绑定拖拽控制飞机移动

有了键盘控制飞机移动,再添加一个拖拽控制飞机移动,在 initData 中添加

// 判断鼠标或手指是否在我方飞机上按下屏幕
this.draw = false
// 给场景绑定鼠标或手指移动事件,如果按下我放飞机并移动则使飞机跟随指针移动
this.input.on('pointermove', pointer => {
if (this.draw) {
this.player.x = this.x + pointer.x - pointer.downX
this.player.y = this.y + pointer.y - pointer.downY
}
})

上述手指或鼠标移动事件添加在 initData 中是因为游戏结束后需要解绑事件,游戏结束后再次开始游戏时只需要调用 initData 即可初始化数据而不用销毁场景重新创建 继续完善事件绑定,在 create 中添加

// 将鼠标或手指按下事件绑定给我方飞机
this.player.on('pointerdown', () => {
this.draw = true
this.x = this.player.x
this.y = this.player.y
})
// 将鼠标或手指抬起事件绑定给场景
this.input.on('pointerup', () => {
this.draw = false
})

现在我们鼠标左键点击飞机拖拽看看

增加我方飞机发射子弹

我方飞机有了,还需要发射子弹杀敌,在 preload 中引入子弹图片

this.load.image('myBullet', 'assets/imgs/bomb.png')

在 initData 中添加

// 我方飞机子弹连发数量,后续有子弹连发道具,每吃到一个会使子弹 +1,也就是这个变量进行记录
this.myBulletQuantity = 1

随即在 create 中初始化一个我方飞机子弹对象池

// 初始化我方飞机子弹对象池
this.myBullets = this.physics.add.group()
// 自动发射子弹,this.time.addEvent 类似 js 定时器,不过它是跟随场景的,场景暂停或停止,它也会跟随暂停或停止
this.time.addEvent({
delay: 260, // 调用间隔
loop: true, // 是否循环调用
callback: () => { // 被执行的回调函数
// 创建子弹,createMyBullet 方法在下面创建
this.createMyBullet()
}
})

给当前 GameScene 类添加 createMyBullet 方法用于生成子弹

update() {
// ...
}
// 生成我方飞机子弹
createMyBullet() {
// 动态子弹连发x坐标处理
for (let i = 0; i < this.myBulletQuantity; i++) {
// 这里的 x 坐标判断主要实现子弹创建时数量不论多少都能在我方飞机上面均匀排列发射
let x =
i < this.myBulletQuantity / 2
?
(
this.myBulletQuantity % 2 != 0 && i > this.myBulletQuantity / 2 - 1
?
this.player.x
:
this.player.x - ((this.myBulletQuantity - i - this.myBulletQuantity / 2 - (this.myBulletQuantity % 2 != 0 ? 0.5 : 0)) * 20)
)
:
this.player.x + (i - this.myBulletQuantity / 2 + (this.myBulletQuantity % 2 != 0 ? 0.5 : 1)) * 20
// 从对象池取子弹,如果对象池没有则会创建一个
const tmpMyBullet = this.myBullets.get(x, this.player.y - this.player.height / 2 + 10, 'myBullet')
tmpMyBullet.name = 'myBullet' // 子弹的名字
tmpMyBullet.setVelocity(0, -500) // 设置速度,x 不变, y 值 -500 使子弹往上发射
tmpMyBullet.setScale(0.6, 1) // 这个子弹是圆的,我想使它 x 缩放一点看起来好看点...
tmpMyBullet.setActive(true)
tmpMyBullet.setVisible(true)
/* 创建子弹后设置 active 和 visible 是 true 是因为下面马上会设置子弹边界检测,
超出屏幕或者碰撞到敌机时会使子弹消失,使用的是 killAndHide(killAndHide 不会销毁对象,
而是将active 和 visible 改为 false,供对象池下次 get 使用),而不是 destroy,
这样子弹每次创建时都会去对象池找没有工作的对象,从而进行复用,
不断销毁和创建会很浪费性能,后续敌方飞机和道具也会使用这种方式
*/
}
}

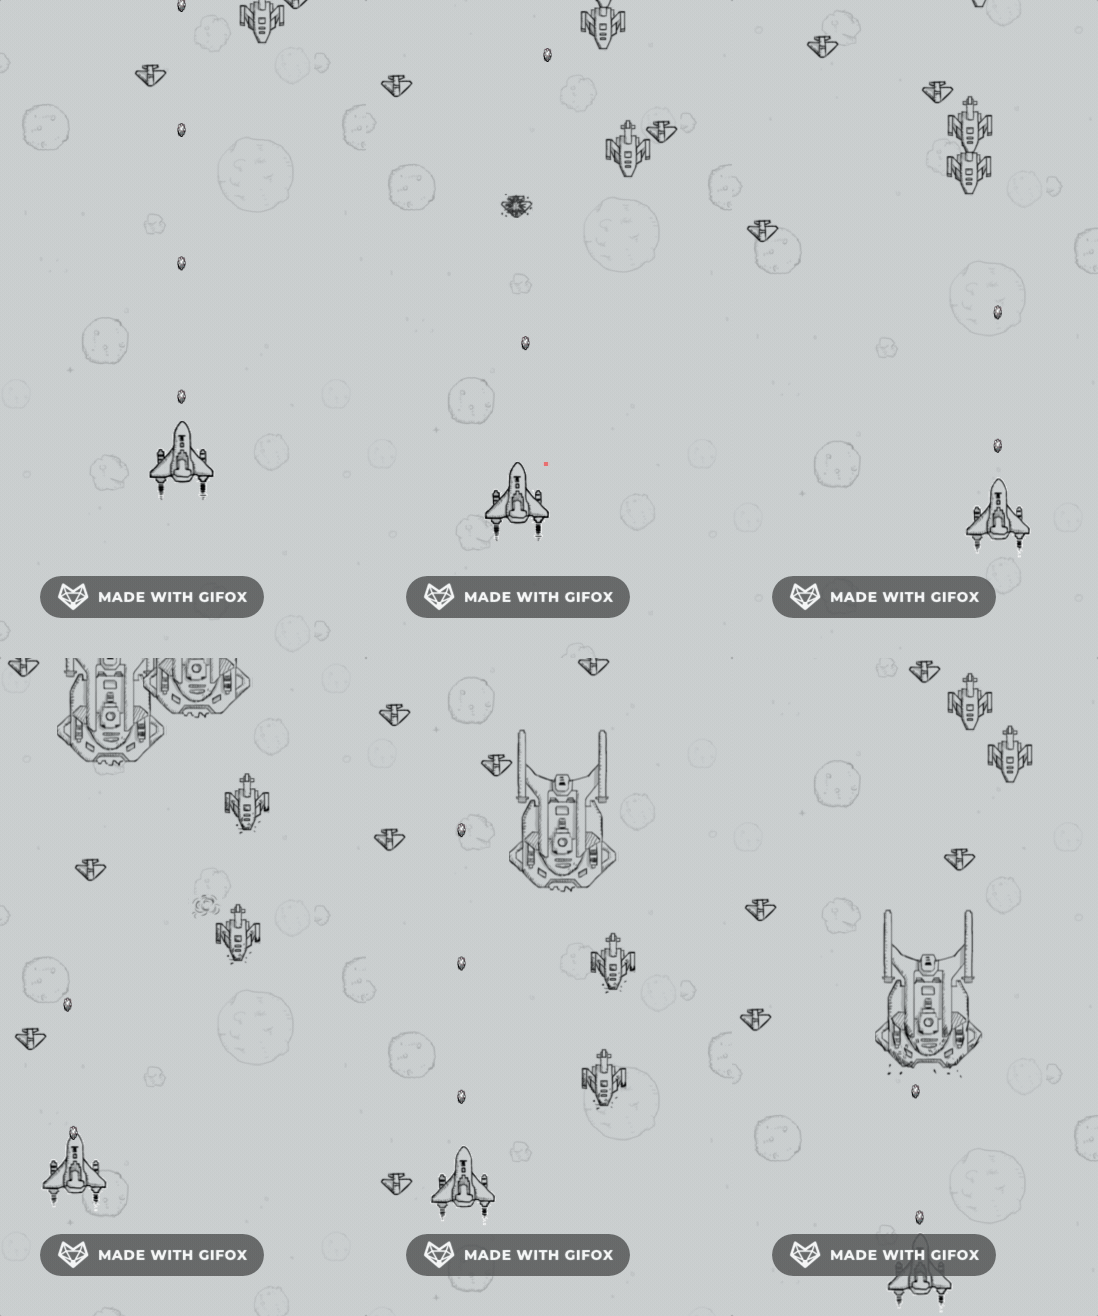
先看看效果

对象池特别注意

感觉上面没什么问题,但实际子弹对象在不断创建,如果继续下去早晚会内存泄漏,在上面代码注释中有说明

// 在自动发射子弹定时器中打印即可看到,添加 console.log(this.myBullets.getChildren())
callback: () => { // 被执行的回调函数
// 创建子弹,createMyBullet 方法在下面创建
this.createMyBullet()
console.log(this.myBullets.getChildren())
}

现在往 update 函数中添加子弹边界检测

update() {
// ...
// 我方飞机子弹对象池子弹边界检测,使用 killAndHide 进行复用提高性能
this.myBullets.getChildren().forEach(item => {
if (item.active && item.y < -item.height) {
this.myBullets.killAndHide(item)
}
})
}

现在再看一下控制台打印

创建敌方飞机

创建敌方飞机与我方飞机发射子弹一样使用对象池即可,其余至于生成规则、位置、移动速度等都根据需要自行处理,有兴趣也可以去看我的源码, 添加敌方飞机相关逻辑后再看看游戏

碰撞检测

现在我们只需要加上子弹与敌方飞机碰撞检测,敌方飞机与我方飞机碰撞检测即可初步完成游戏

// 我方子弹与敌机碰撞检测,有三种敌方飞机,只需要将我方子弹与这三个敌方飞机对象池设置碰撞检测即可,
// 其中 enemyAndMyBulletCollision 为碰撞回调函数 enemyPlanes1/2/3 为三种敌机对象池
this.physics.add.overlap(this.myBullets, this.enemyPlanes1, this.enemyAndMyBulletCollision, null, this)
this.physics.add.overlap(this.myBullets, this.enemyPlanes2, this.enemyAndMyBulletCollision, null, this)
this.physics.add.overlap(this.myBullets, this.enemyPlanes3, this.enemyAndMyBulletCollision, null, this)

给当前 GameScene 类添加 enemyAndMyBulletCollision 方法用于处理我方子弹与敌机碰撞

// 我方子弹与敌机碰撞检测
enemyAndMyBulletCollision(myBullet, enemyPlane) {
// 该回调函数在碰撞时只要对象没销毁就会多次触发,所以这里使用 active 判断对象是否存在屏幕
if (myBullet.active && enemyPlane.active) {
// 判断敌机名字处理挨打,爆炸动画
let animNames = []
let enemyPlanes = null
switch (enemyPlane.name) {
case 'midPlane':
animNames = ['midPlaneAida', 'midPlaneBoom']
enemyPlanes = this.enemyPlanes2
break
case 'bigPlane':
animNames = ['bigPlaneAida', 'bigPlaneBoom']
enemyPlanes = this.enemyPlanes3
break
case 'smallPlane':
animNames = ['', 'smallPlaneBoom']
enemyPlanes = this.enemyPlanes1
break
default:
break
}
enemyPlane.hp -= 1 // 1发子弹减少1滴血,初始化时小飞机,中飞机,大飞机血量分别是1,3,5
// 显示敌机挨打动画
if (enemyPlane.hp > 0) {
enemyPlane.anims.play(animNames[0])
}
// 血量没了显示敌机爆炸动画,0.18s后消失,也就是有0.18s的爆炸动画
if (enemyPlane.hp == 0) {
enemyPlane.anims.play(animNames[1]) // 播放爆炸动画
enemyPlane.setVelocity(0, 0) // 血量没了显示爆炸动画期间不再继续往下移动
setTimeout(() => {
enemyPlanes.killAndHide(enemyPlane)
}, 180)
}
// 防止敌机在爆炸动画中也会使子弹消失
if (enemyPlane.hp >= 0) {
this.myBullets.killAndHide(myBullet)
}
}
}

敌机与我方飞机碰撞检测同理,只需要使游戏物理系统暂停、播放我机爆炸动画、处理相应游戏结束逻辑即可

最后记分与道具属于游戏内景上添花,自己随便根据个人需求处理,源码中也有对应示例

结语

在使用Phaser之前,也使用PIXIJS写过一些demo,PIXIJS写起来更像原生开发,而不得不说Phaser封装的很完善,世界、场景、精灵、动画、事件、对象池、物理系统等等都是现成的,并且官网有很多教程和案例大大降低了学习成本。 半年前我使用dom + 原生js面向对象也写过飞机大战(原生js面向对象实现飞机大战小游戏(有BOSS,含源码)),而这次Phaser重构版,全篇只有一个canvas元素,一切都由引擎渲染,性能不言而喻,在碰撞检测、音效、事件绑定等等方面也都有现成的API,在前端来讲做一些小案例比较合适,对于较为复杂的项目还是得用cocos或者unity甚至虚幻等更专业引擎了。

Phaser官网

https://phaser.io/

· 阅读需 6 分钟
hyminghan

预先了解 setState 的两种传参方式

1、直接传入新值 setState(options);

列如:

const [state, setState] = useState(0);
setState(state + 1);

2、传入回调函数 setState(callBack);

例如:

const [state, setState] = useState(0);
// prevState 是改变之前的 state 值,return 返回的值会作为新状态覆盖 state 值
setState((prevState) => prevState + 1);

useState 异步回调获取不到最新值及解决方案

通常情况下 setState 直接使用上述第一种方式传参即可,但在一些特殊情况下第一种方式会出现异常; 例如希望在异步回调或闭包中获取最新状态并设置状态,此时第一种方式获取的状态不是实时的,React 官方文档提到:组件内部的任何函数,包括事件处理函数和 Effect,都是从它被创建的那次渲染中被「看到」的,所以引用的值任然是旧的,最后导致 setState 出现异常:

import React, { useState, useEffect } from "react";

const App = () => {
const [arr, setArr] = useState([0]);

useEffect(() => {
console.log(arr);
}, [arr]);

const handleClick = () => {
Promise.resolve()
.then(() => {
setArr([...arr, 1]); // 此时赋值前 arr 为:[0]
})
.then(() => {
setArr([...arr, 2]); // 此时赋值前 arr 为旧状态仍然为:[0]
});
};

return (
<>
<button onClick={handleClick}>change</button>
</>
);
};

export default App;

上面代码,App 组件实际也是个闭包函数,handleClick 里面引用着 arr,第一次 setArr 后 arr 的值确实更新了,我们也可以在下面截图中看到,但此次执行的 handleClick 事件处理函数作用域还是旧的,里面引用的 arr 仍然为旧的,导致第二次 setArr 后结果为 [0, 2]

在 class 组件中我们可以使用 setState(options, callBack); 在 setState 的第二个参数回调函数中再次进行 setState,也不存在闭包作用域问题,但是 React Hook 中 useState 移除了 setState 的第二个参数,而且若嵌套太多也不佳;

解决方案 1(推荐使用):

将上述代码使用第二种(回调)方式传参

const handleClick = () => {
Promise.resolve()
.then(() => {
// 这里也可以不改,使用第一中传参方式 setArr([...arr, 1]); 因为这里不需要获取最新状态
setArr((prevState) => [...prevState, 1]);
})
.then(() => {
// 这里必须改成回调函数传参方式,否则会读取旧状态,导致异常
setArr((prevState) => [...prevState, 2]);
});
};

解决方案 2:

使用 useReducer 仿造类组件中的 forceUpdate 实现组件强制渲染;

注意: 此方案仅限于只有页面依赖该数据时适用,如果有类似 useEffect 等 hook 在监听该数据(示例中的 arr )时无法实时捕捉到变化

import React, { useState, useReducer } from "react";

const App = () => {
const [arr, setArr] = useState([0]);
const [, forceUpdate] = useReducer((x) => x + 1, 0);

const handleClick = () => {
Promise.resolve()
.then(() => {
arr.push(1); // 如果这里也需要做一次渲染在改变状态后调用 forceUpdate() 即可
})
.then(() => {
arr.push(2);
forceUpdate();
});
};

return (
<>
<h1>{arr.toString()}</h1>
<button onClick={handleClick}>change</button>
</>
);
};

export default App;

点击前:

点击后:

解决方案 3:

利用 ref ,state 发生改变同时将值映射到 ref ref 的改变不会触发页面更新,但在异步中一定能拿到最新值,所以需要在页面上用就使用 state,在异步逻辑中用就使用 ref

import React, { useState, useRef, useEffect } from "react";

const App = () => {
const [arr, setArr] = useState([0]);
let ref = useRef();
useEffect(() => {
ref.current = arr;
console.log(arr);
}, [arr]);

const handleClick = () => {
Promise.resolve()
.then(() => {
const now = [...ref.current, 1];
ref.current = now;
setArr(now);
})
.then(() => {
setArr([...ref.current, 2]);
});
};

return (
<>
<h1>{arr.toString()}</h1>
<button onClick={handleClick}>change</button>
</>
);
};

export default App;

终极方案:

上面例 3 这类方式可以自己封装一个 hooks 将 state 和 ref 进行关联,同时再提供一个方法供异步中获取最新值使用,例如:

const useGetState = (initVal) => {
const [state, setState] = useState(initVal);
const ref = useRef(initVal);
const setStateCopy = (newVal) => {
ref.current = newVal;
setState(newVal);
};
const getState = () => ref.current;
return [state, setStateCopy, getState];
};

const App = () => {
const [arr, setArr, getArr] = useGetState([0]);
useEffect(() => {
console.log(arr);
}, [arr]);

const handleClick = () => {
Promise.resolve()
.then(() => {
setArr([...getArr(), 1]);
})
.then(() => {
setArr([...getArr(), 2]);
});
};

return (
<>
<h1>{arr.toString()}</h1>
<button onClick={handleClick}>change</button>
</>
);
};

这样看起来更加易于阅读,异步中获取最新值就通过调用 getArr,同时 ahooks 中也同样提供了这种 hooks https://ahooks.js.org/zh-CN/hooks/use-get-state/,或者是另一种: https://ahooks.js.org/zh-CN/hooks/use-latest/,其原理都大同小异。

最后在附上官方相关解释文档:为什么我会在我的函数中看到陈旧的 props 和 state ?